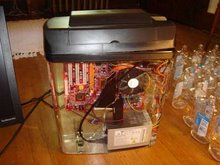
Well that's what my friend, the admin of leetupload.com, and I did. We got our inspiration from http://www.pugetsystems.com/submerged.php and made a few changes of our own.
This project is so unnatural, it defies logic. Drop an expensive piece of electronics INTO A VAT OF CLEAR LIQUID?!?!? WHATS WRONG WITH YOU MAN?!?
Nothing, mineral oil is an insulator. This means it has no effect on electronic equipment. Gotta love chemistry and physics.
If you are going to attempt this project on your own, here are a few things to keep in mind:
- If you have all of the hardware necessary (a computer), it will cost you about $30 to get a 5 gallon aquarium from somewhere like K-Mart or Wal-Mart.
- Finding 5 gallons of mineral oil is INSANELY HARD. It is considered a strong laxative, and can be used on horses. Some farm equipment dealers might have gallon jugs for about $11 apiece, or you can do what we had to do, and buy 37 individual pints and buy out two Wal-Marts and a K-Mart worth of mineral oil:

That's a LOT of laxative. The total was just a tick over $60 for that, Which brings the total cost of the project to about $90 - $100
Ok, now to get started on putting the computer into the aquarium. I used a sheet of plexiglass to hold the motherboard in place, so that way when it is filled with mineral oil, the mobo will appear to be floating.

I scored onto the plexiglass where the screw holes on the motherboard are, and drilled where it was scored, so that way I could screw the motherboard onto the plexiglass. If you are doing this project, DO NOT try to screw the motherboard onto the plexi without drilling it first! It will crack!
Check out how the power supply will fit at the bottom:

Then see how the plexi/mobo combo fit into the aquarium with the power supply:

Now your probably wondering how we kept the plexi upright? Do you see that piece of duct-tape holding a clear cube up towards the top of the mobo? I super glued 4 pieces of plexiglass together, glued that onto the plexi/mobo, and am getting ready to glue that to the side of the aquarium.

We got lucky and the aquarium came with a suitable top to seal everything up in nicely. It even had a place where we could have the exit to the cables, but it was in the wrong spot. So I fixed that with a dremel and a carbide bit:

Here is what it looks like from the top:

We made absolutely sure the glue is dry before we continued. There was a gap of about 3 days before we began the next phase of the project. After you connect all of the cables, fans, and other junk, its time to put the oil in. We decided to just go for it rather than test it out, and everything turned out fine. The following pictures are of us filling it with mineral oil, and it still working.
Before oil:

Monitor with dry computer, with bag underneath to prevent spillage from harming the floor.

It boots before the oil:

Trust me, use a funnel

Linux boot screen:


From the back:


The hard drive needs to be outside of the oil. There is a membrane pressure switch that will shutdown the hard drive if it is submerged in anything.

Had to hot glue the wires and everything on the top. This was to seal it in case of accidental bumping, and help prevents what little evaporation will happen over the years:


After we emptied the bottles:


We got lucky and the aquarium came with a suitable top to seal everything up in nicely. It even had a place where we could have the exit to the cables, but it was in the wrong spot. So I fixed that with a dremel and a carbide bit:

Here is what it looks like from the top:

We made absolutely sure the glue is dry before we continued. There was a gap of about 3 days before we began the next phase of the project. After you connect all of the cables, fans, and other junk, its time to put the oil in. We decided to just go for it rather than test it out, and everything turned out fine. The following pictures are of us filling it with mineral oil, and it still working.
Before oil:

Monitor with dry computer, with bag underneath to prevent spillage from harming the floor.

It boots before the oil:

Trust me, use a funnel

Linux boot screen:


From the back:


The hard drive needs to be outside of the oil. There is a membrane pressure switch that will shutdown the hard drive if it is submerged in anything.

Had to hot glue the wires and everything on the top. This was to seal it in case of accidental bumping, and help prevents what little evaporation will happen over the years:


After we emptied the bottles:

And just in case you don't believe us, here is some video proof. Pay special attention to how smoothly the fans operate in the oil, and the ripples they make in it:
Here is the leetupload.com tutorial on how to do the project.
http://www.leetupload.com/tutorials/1337_fleet/
Please Digg this story at: http://digg.com/mods/Oil_Cooled_PC_5_Gallons_of_Silent_Death
Here is the leetupload.com tutorial on how to do the project.
http://www.leetupload.com/tutorials/1337_fleet/
Please Digg this story at: http://digg.com/mods/Oil_Cooled_PC_5_Gallons_of_Silent_Death


